Category: .NET

Memory Dump Forensics: A Systematic Guide to Retrieving fcnMode Value from Memory Dumps

Memory Dump Forensics: A Systematic Guide to Retrieving fcnMode Value from Memory Dumps

This is the second post in the fcnMode series. The first part can be viewed from the following link: File Change Notification (fcnMode): What is it and how does it affect my Sitecore Application. This blog post will serve as a comprehensive guide for obtaining the fcnMode (File Change Notification) value from Memory Dumps.

In some cases, you may need to verify the actual value of fcnMode that has been set, and using memory dumps is the only way to do so. This process is complex yet critically important, and information about it is scarce on the web.

Fig: Dumps are complicated

The steps to retrieve the fcnMode value from memory dumps are as follows:

1. Download WinDbg:

Download the WinDbg software from the following link: Install the Windows debugger.

The most straightforward installation method is to download the WinDbg Packet Installer and follow the instructions displayed on the screen.

2. IISReset and Browse the Site:

Open Command Prompt as Administrator and execute the iisreset command.

After the command has finished executing, browse the website.

Fig: Always feels good

3. Downloading the User Dumps:

  • Open Internet Information Services (IIS) -> Click on the Server Name -> Click on Worker Processes -> Note down the Process ID of the App Pool for your website.
Fig: Note down the Process ID from IIS
  • Go to Task Manager -> Details -> Locate the w3wp.exe process with the PID noted in the previous step -> Right-click on it -> Choose “Create dump file.”
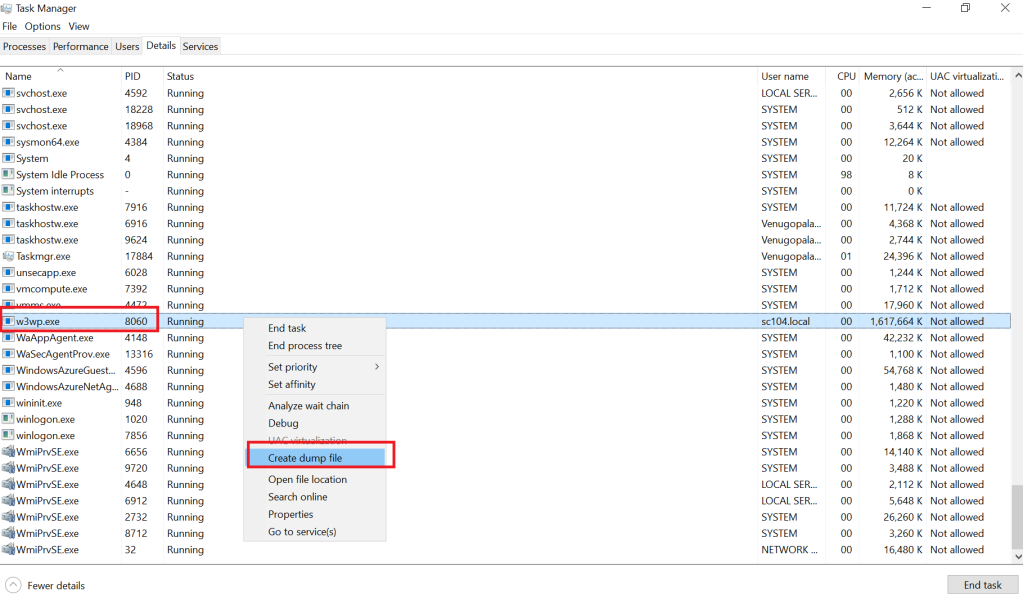
Fig: Create Dump File from Task Manager
  • Note down the location where the dump file has been created. This is typically in the following directory: \AppData\Local\Temp\2\w3wp.dmp.

4. Attaching the .dbg file in WinDbg:

Open the WinDbg application in Administrator mode -> Go to File -> Open Dump File -> Navigate to and select the dump file created in Step 3. This process may take some time. Monitor the progress bar at the bottom; once it disappears, the dump file has been successfully loaded.

Fig: The Progress Bar on WinDbg. Wait for this bar to go away.
Fig: Still Waiting

5. Running the commands:

Execute the following commands in the specified order. Please note these commands may take a longer time to execute and hence do not execute the next command until the *BUSY* label next to the input box disappears.

Fig: The BUSY label
Fig: Recipe for Disaster

5.1. Open the Command Viewer Window:

Click on View on DebugDiag -> Click on Command

5.2. Run the analyze command:

!analyze -v

This command is essential as it would download the relevant SOS Debugging Extension files which are required to run the next dumpheap command.

Note: You need to run this command only once. After this command has been successfully executed, you may even attach different dump files and check the fcnMode values.

5.3. Run the dumpheap command to get the memory address:

 !dumpheap -type System.Web.FileChangesMonitor

Please note the format for the command is listed below. It can be used to get the memory address of other classes too:

!dumpheap -type YourNamespace.YourClass

The output would be similar to the following:

         Address               MT     Size    
0000018e752b7430 00007ffd36800858      104    

5.4. Download and load the MEX Debugging Extension:

5.4.1. Download MEX:

Download the MEX Debugging Extension from the following link: MEX Debugging Extension for WinDbg. Double-click on the downloaded .exe file and Select a location where you want to place the extracted files (eg. C:\MEX Debugger)

5.4.2. Load the MEX Extension in the WinDBG command viewer:

Type the following command in the WinDBG command viewer:

.load C:\MEX Debugger\Mex\x64\mex.dll

Note: Assuming mex.dll is stored at C:\MEX Debugger\Mex\x64

5.5. Run the MEX DisplayObj command to get the value of fcnMode:

Run the following MEX DisplayObj command with the address found in Step 5.3 (0000018e752b7430):

!mex.DisplayObj 0x0000018e752b7430

The response format should resemble the following block:

0x0000018e752b7430 System.Web.FileChangesMonitor
[statics]
0000 _aliases : NULL
0008 _dirs : NULL
0010 _dirMonSubdirs : NULL
0018 _subDirDirMons : NULL
0020 _dirMonSpecialDirs : NULL
0028 _callbackRenameOrCriticaldirChange : NULL
0030 _dirMonAppPathInternal : NULL
0038 _appPathInternal : NULL
0040 _activeCallbackCount : 0 (System.Int32)
0044 _FCNMode : 1 (System.Int32)
0048 _disposed : False (System.Boolean)
0050 _lockDispose : 0000018e752b7488 (System.Web.Util.ReadWriteSpinLock)

The Integer value of _FCNMode in the above response indicates the actual set value. In this case, the integer value 1 denotes that the File Change Notification has been disabled. The next section provides details about the values from the _FCNMode attribute.

The _FCNMode Values:

The following table denotes the _FCNMode value from the dump for various scenarios:

_FCNMode Value from DumpSetting
0fcnMode is not disabled
1fcnMode is Disabled
2fcnMode is Single
Fig: _FCNMode value and the settings

That concludes our exploration of retrieving the fcnMode value from memory dumps. By following these steps, you can now confidently navigate memory snapshots to locate and interpret this crucial information. Stay tuned for the next posts. Until then, happy debugging!

About me:

Vivek Anandan Venugopalan

Hi! I’m a Sitecore Certified Advanced Developer from India with 8+ years of Experience working with Sitecore. I am an avid Railfan and love Cycling and Traveling. I also have a couple of travel blogs which can be checked by clicking on the first couple of links below.

File Change Notification (fcnMode): What is it and how does it affect my Sitecore Application

File Change Notification (fcnMode): What is it and how does it affect my Sitecore Application

The File Change Notification or the fcnMode is a great feature that is available in ASP.net applications. This blog provides an overview of the File Change Notification (fcnMode) and its significance to Sitecore Applications.

Although this blog post is inclined towards a Sitecore Application, I have also included basic information related to FCNMode which would be useful for plain .NET Applications too.

What is File Change Notification (fcnMode)

The File Change Notification is an inbuilt feature in ASP.net that detects the file changes from your website and automatically restarts the Application Domain. For the users who are new to Sitecore, when you publish a DLL change to your website, you will see the website taking some additional time to load. This is due to FCN which forces an AppDomain restart that causes the website to take more time to load.

There is a substantial difference between Application Pool and Application Domain:

Many times, “Application Pool” and “Application Domain” are used interchangeably, but there is a considerable difference between the two.

The Difference:

  • An Application Domain provides isolation between .NET applications running within the same process while the Application Pool provides process-level isolation.
  • Two different Application Domains may share a single-worker process (w3p) but two different Application Pools won’t share a single-worker process.
Fig: No sharing
  • It is better to use the terms Recycle with Application Pool and Restart with Application Domain to avoid confusion viz. Recycle an Application Domain and Restart the Application Pool.
  • Please note that Application Domain is a concept specific to an ASP.net application while Application Pool can be used for any type of application.
Fig: Re-Iterating!

The similarity between the two is that both Application Domain and Application Pool are used to provide Application Isolation.

Why disable the File Change Notification (FCN):

Restarting the application domain is an expensive operation for any Sitecore application and hence it would be good to disable the FCN for performance tuning. Besides it would also help in avoiding undesired App Domain restarts that might be happening in the background which may not have been reported yet. Even if you are not facing an issue related to unwanted or undesired app domain restarts, you should disable the File Change Notification to solve a problem even before it occurs.

Fig: Modern Problems!

Sitecore also recommends this step in the following article: Sitecore Tuning Recommendations.
Although this article is defined for Sitecore Managed Cloud instance, this is applicable for On-Premise setups too.

The Effect:

After you disable the File Change Notification, IIS will no longer monitor the changes other than the Web.config and the App_Config changes in your Website. Even after you deploy a DLL change, the App Domain won’t be restarted and you won’t witness any interruption in accessing your website.

How to Disable the File Change Notification?

Step 1: Add the fcnMode=”Disabled” attribute in Web.config

To set the File Change Notification, you need to make the following change in the root Web.config file. The following entry should be added:

<configuration>
    <system.web>
        <httpRuntime fcnMode="Disabled"/>
    </system.web>
</configuration>

Please note that if your root Web.config already contains the <httpRuntime> node, you need to add the attribute fcnMode=”Disabled” inside this existing node itself:

<httpRuntime targetFramework="4.8" fcnMode="disabled" maxRequestLength="512000" executionTimeout="600" enableKernelOutputCache="false" relaxedUrlToFileSystemMapping="false" requestValidationMode="4.0" enableVersionHeader="false" requestValidationType="Sitecore.Web.RequestValidators.SitecoreBackendRequestValidator, Sitecore.Kernel"/>

Note: The above Web.config entry has been taken from a Vanilla instance of the Sitecore 10.4 setup.

Important Considerations after setting fcnMode=”Disabled”

1. Add App Pool Recycle step in the Release Pipeline:

As the Application Domain wouldn’t be restarted after implementing this setting, all your newly deployed changes wouldn’t be visible on the website after deploying them right away. If you are using a CI/CD Pipeline for deployments, you must add a Recycle App Pool step in the release pipeline after deployment to each environment.

2. Manual Deployments: Mandatory App Pool Recycles after Deployment:

After any manual file deployments, the App Pool Recycle step should be performed manually. Make sure to notify your Deployment Team regarding this important step otherwise the changes from the deployment won’t be reflected on the website.

Fig: Don’t hide the Pain Harold!

Some exceptions to fcnMode=”Disabled” in a Sitecore Application:

Even after setting fcnMode=”Disabled”, the app domain would be recycled if you make changes to the Web.config file or make any modifications related to .config files in the App_Config folder. You will see the following entry in the Sitecore log file after modifying any .config file in the App_config folder:

14144 01:52:40 INFO  Config file modified: D:\Website\SC104.local\App_Config\ConnectionStrings.config
1664 01:52:40 INFO  **************************************************
1664 01:52:40 WARN  Sitecore shutting down
1664 01:52:40 WARN  Shutdown message: HostingEnvironment initiated shutdown

Please note this is only limited to the .config files inside the App_Config and not any other files.
To sum it up, the following changes trigger an application domain restart in a Sitecore application even after setting fcnMode=”Disabled”:

  • Web.config change
  • Config file changes inside the App_Config folder.

The following article on Microsoft Blogs gives detailed insights on the directories and files that are monitored when FCNMode is set to Default or NotSet. This article mentions File Change Notification to be one of the most loved and hated features of ASP.NET which is apt: File Change Notification – What exactly is monitored?

Fig: The relationship with FCN

This completes the blog post explaining the fcnMode and its significance related to Sitecore Applications. In the next blog post, I will explain the process of fetching the fcnMode value from Memory Dumps via WinDBG (Windows Debugger) which is quite critical in debugging scenarios.

Further Reading:

About me:

Vivek Anandan Venugopalan

Hi! I’m a Sitecore Certified Advanced Developer from India with 8+ years of Experience working with Sitecore. I am an avid Railfan and love Cycling and Traveling. I also have a couple of travel blogs which can be checked by clicking on the first couple of links below.

Where is my NuGet Configuration?

Where is my NuGet Configuration?

NuGet is one of the most convenient tools used in almost every .NET implementation. I use it day in and day out and was still unaware of important basic information related to its configuration.

This post is the result of my own ignorance of this topic hence I found it necessary to share it so that it is helpful to others in the community. I was recently working on an assignment to get our Sitecore application up on a fresh server using a new build agent. The regular pre-requisites and tools were installed on the agent and then we triggered a build. The build failed at the Nuget Restore step and displayed the following error:

##[error]Error: Not found nugetConfigPath
##[error]Packages failed to restore

The above error was self-explanatory in that the pipeline was trying to find the Nuget configuration but unable to locate it.

The Nuget Settings:

The heart of the Nuget configuration lies in the Nuget.config file. This is an important XML file that contains details about the package sources that should be used to install or restore the respective packages used in the project.

Packages sources can be :

  1. Public Sources
  2. Private Sources
  3. Offline Sources from the Disk: eg: Visual Studio Offline Packages

An example of a Nuget.config file is provided below:

<?xml version="1.0" encoding="utf-8"?>
<configuration>
  <packageSources>
    <add key="nuget.org" value="https://api.nuget.org/v3/index.json1" protocolVersion="3" />
    <add key="Sitecore Myget" value="https://sitecore.myget.org/F/sc-packages/api/v3/index.json" />
    <add key="Microsoft Visual Studio Offline Packages" value="C:\Program Files (x86)\Microsoft SDKs\NuGetPackages\" />
  </packageSources>
</configuration>

My Initial Thoughts:

Every .NET project that I had worked on until this moment had a Nuget.config file committed in the solution folder so I checked the solution folder to see if there were any issues. I did not find the file anywhere in the project. I thought this might be a miss from one of the developers working on the project who may have deleted the Nuget.config in their recent commits. I cleaned the solution and triggered a rebuild from Visual Studio expecting it to throw an error that Nuget had failed to restore but to my surprise, the build succeeded.

This is when I started thinking about the magical thing that was present on my local machine that caused the Nuget packages to restore successfully without a Nuget.config file in the solution.

You don’t require Magic when you know the Basics:

There are three locations where a Nuget.config file may be scoped from and the solution root is only one of them. They are:

  1. Solution
  2. User
  3. Computer

1. Solution:

This is the most commonly used approach where the Nuget.config file is stored at the root level usually at the same level where your solution file is stored. There is an additional sub-scope that the Nuget.config may even be placed inside any folder up to the drive root.

Eg. Solution file located at D:\Project\Source\MySolution.sln and the Nuget.config file being present at D:\Project

It is the best practice to have the configuration file source controlled usually at the solution root. This gives you control over the configuration and allows you to track the changes.

2. User:

In this scope, the Nuget.config is loaded from the AppData folder for the specific user. The exact location is: %AppData%/Nuget/Nuget.config

In the specific case of our application, the Nuget.config was being scoped from this location.

3. Computer:

At the Computer Level, the configuration is scoped from the location: %ProgramFiles(x86)%\NuGet\Config

Now that you know about the possible scoping locations, you may check each of your applications to understand where the Nuget.config file actually being scoped from.

Some Additional Inputs – Moving Away From Nuget:

As we are reading about Nuget, I found it essential to share a significant Sitecore limitation related to Nuget. Whenever Sitecore releases a Hotfix, it does not provide updates to the corresponding Nuget packages. You have to manually copy the DLL files manually from the hotfix package and reference them accordingly. This has prompted multiple Sitecore implementations to move away from Nuget to the old offline package references. It is like returning to Feature Phones in the era of Smart Phones.

Sitecore should take this feedback and improve on this front. If you would like to read more related to this topic, you may check my previous post: Installing a Sitecore Hotfix: Understand the Sitecore Public NuGet Feeds Limitations

This completes the post sharing a piece of important basic knowledge regarding the Nuget configuration. See you soon in the next blog post.

Further Reading:

  1. Microsoft’s Article on Common NuGet Configurations
  2. Sitecore Public NuGet feed FAQ

About me:

Vivek Anandan Venugopalan

Hi! I’m a Sitecore Certified Advanced Developer from India with 8+ years of Experience working with Sitecore. I am an avid Railfan and love Cycling and Traveling. I also have a couple of travel blogs which can be checked by clicking on the first couple of links below.